Become a videogame developer master with Gosu and Ruby.
Bored of develop amazing websites? Want to try something totally different, but without leaving our beloved Ruby? If the answer to these two questions is yes, we'll see a way to do something new while having fun. Let's go!
But... What's Gosu?
Gosu is a 2D game development library for Ruby and C++, available for Mac OS X, Windows and Linux. It's open source (MIT License), and the C++ version is also available for iPad, iPhone and iPod Touch. Provides basic building blocks for games:
- A window with a main loop and callbacks
- 2D graphics and text, accelerated by 3D hardware
- Sound samples and music in various formats
- Keyboard, mouse, and gamepad input
We're going to use the Ruby flavor, so we need to install the Gosu gem with gem install gosu. But first, in order to be able to use it, we need to install some dependencies. I'm going to use Mac OS X, so I only need to install sdl2 library via Homebrew executing brew install sdl2. Here you have the links to the official documentation for all OS:
- Mac OS X: Getting Started on OS X
- Linux: Getting Started on Linux
- Windows: Getting Started on Windows
Ready, steady... let's do some code!
Ok, we have all installed. so the next step is start the development. We could use Gosu and develop our game as a simple Ruby application (without structure of any kind), throwing some files with our code into a folder, but in order to maintain a minimum structure, we're going to do it as a regular Rails gem. I'm going to name my game 'Simplelogica: The Game', so:
user@computer:~$ bundle gem simplelogica_the_game
This generate the following basic structure:
.
+-- lib
|   +-- simplelogica_the_game
|       +-- version.rb
|   +-- simplelogica_the_game.rb
+-- bin
|   Gemfile
|   Rakefile
|   README.md
|   ...
|   simplelogica_the_game.gemspec
To store all the assets that we'll use in our game (images, sounds, music...), we're going to create the assets folder in our project, with some other folders inside it (images, fonts, fixtures...). At the end we're going to have a structure like this:
.
+-- assets
|   +-- fixtures
|       +-- sound.wav
|       +-- music.wav
|       +-- ...
|   +-- fonts
|       +-- custom_font.svg
|   +-- images
|       +-- backgrounds
|       +-- sprites
|       ...
+-- lib
|   +-- simplelogica_the_game
|       +-- version.rb
|   +-- simplelogica_the_game.rb
+-- bin
|   Gemfile
|   Rakefile
|   README.md
|   ...
|   simplelogica_the_game.gemspec
We're a great developers, but if art is our weak point, to make the design of the scenarios, characters, etc... of our game, we can go to communities of artists who share their resources to everyone can make use of them, e.g. http://opengameart.org/.
Well, let's explain very quickly the basis of the development with the help of the official Gosu Ruby introduction (you have the complete documentation of Gosu here if you want to go deeper).
Don't worry, as always, at the end of the post I'll put links to the repo with the final code to the game I made so you can see all detail
Spoiler! The examples shown here are directly extracted of the Gosu wiki. All the explanations and example codes of the next parts belongs to them.
Overriding Window's callbacks
Every Gosu application starts with a class that derives from Gosu::Window. A minimal window class looks like this:
require 'gosu'

class GameWindow < Gosu::Window
  def initialize
    super 640, 480
    self.caption = "Gosu Tutorial Game"
  end

  def update
  end

  def draw
  end
end

window = GameWindow.new
window.show
The constructor initializes the Gosu::Window base class. The parameters shown here create a 640x480 pixels large window. It also sets the caption of the window, which is displayed in its title bar. You can create a fullscreen window by passing :fullscreen => true after the width and height.
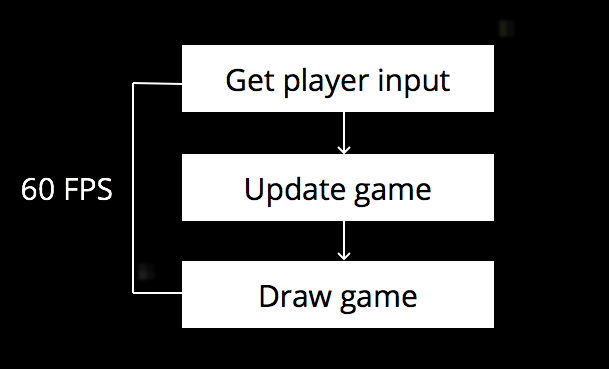
update() and draw() are overrides of Gosu::Window's methods. update() is called 60 times per second (by default) and should contain the main game logic: move objects, handle collisions...
draw() is called afterwards and whenever the window needs redrawing for other reasons, and may also be skipped every other time if the FPS go too low. It should contain the code to redraw the whole screen, but no updates to the game's state.
Then follows the main program. We create a window and call its show() method, which does not return until the window has been closed by the user or by calling close().
The window loop it's something like this:

Using images
require 'gosu'

class GameWindow < Gosu::Window
  def initialize
    super 640, 480
    self.caption = "Gosu Tutorial Game"

    @background_image = Gosu::Image.new("media/space.png", :tileable => true)
  end

  def update
  end

  def draw
    @background_image.draw(0, 0, 0)
  end
end

window = GameWindow.new
window.show
Gosu::Image#initialize takes two arguments, the filename and an (optional) options hash. Here we set :tileable to true. Basically, you should use :tileable => true for background images and map tiles.
The window's draw() member function is the place to draw everything, so we override it and draw our background image.
Player and movement
class Player
  def initialize
    @image = Gosu::Image.new("media/starfighter.bmp")
    @x = @y = @vel_x = @vel_y = @angle = 0.0
    @score = 0
  end

  def warp(x, y)
    @x, @y = x, y
  end

  def turn_left
    @angle -= 4.5
  end

  def turn_right
    @angle += 4.5
  end

  def accelerate
    @vel_x += Gosu::offset_x(@angle, 0.5)
    @vel_y += Gosu::offset_y(@angle, 0.5)
  end

  def move
    @x += @vel_x
    @y += @vel_y
    @x %= 640
    @y %= 480

    @vel_x *= 0.95
    @vel_y *= 0.95
  end

  def draw
    @image.draw_rot(@x, @y, 1, @angle)
  end
end
Player#acceleratemakes use of the offsetx/offsety functions. They are similar to what some people use sin/cos for: For example, if something moved 100 pixels at an angle of 30°, it would move a distance ofoffset_x(30, 100)pixels horizontally andoffset_y(30, 100)pixels vertically.- When loading BMP files, Gosu replaces
#ff00ffwith transparent pixels. - Note that
draw_rotputs the center of the image at (x, y) - not the upper left corner as draw does! This can be controlled by the centerx/centery arguments if you want. - The player is drawn at z=1, i.e. over the background.
Using our Player class inside Window
class GameWindow < Gosu::Window
  def initialize
    super 640, 480
    self.caption = "Gosu Tutorial Game"

    @background_image = Gosu::Image.new("media/space.png", :tileable => true)

    @player = Player.new
    @player.warp(320, 240)
  end

  def update
    if Gosu::button_down? Gosu::KbLeft or Gosu::button_down? Gosu::GpLeft then
      @player.turn_left
    end
    if Gosu::button_down? Gosu::KbRight or Gosu::button_down? Gosu::GpRight then
      @player.turn_right
    end
    if Gosu::button_down? Gosu::KbUp or Gosu::button_down? Gosu::GpButton0 then
      @player.accelerate
    end
    @player.move
  end

  def draw
    @player.draw
    @background_image.draw(0, 0, 0);
  end

  def button_down(id)
    if id == Gosu::KbEscape
      close
    end
  end
end

window = GameWindow.new
window.show
Gosu::Window provides two member functions button_down(id) and button_up(id) which can be overridden, and do nothing by default. While getting feedback on pushed buttons via button_down is suitable for one-time events such as UI interaction, jumping or typing, it is not place to implement actions that span several frames - for example, moving by holding buttons down. This is where the update() member function comes into play, which calls the player's movement methods depending on which buttons are held down during this frame.
Text and sound
We could add some sounds and custom fonts using the Gosu classes Gosu::Font and Gosu::Sample, like this:
class Player
  attr_reader :score

  def initialize
    @font = Gosu::Font.new(20)
    @image = Gosu::Image.new("media/starfighter.bmp")
    @beep = Gosu::Sample.new("media/beep.wav")
    @x = @y = @vel_x = @vel_y = @angle = 0.0
    @score = 0
  end

  # Some code here...

  def collect_stars(stars)
    stars.reject! do |star|
      if Gosu::distance(@x, @y, star.x, star.y) < 35 then
        @score += 10
        @beep.play
        true
      else
        false
      end
    end
  end
end
Ok, I get it, but... how should I put all together to develop my game?
After you've tried these simple examples and have delved a little deeper into the Gosu's documentation, you're ready to code your game. The basic idea is to create a class for any resource you want to have in your game (window, sprite, player, enemy, bullet...). On the main class of the project (in my case, lib/simplelogica_the_game.rb file), you have to require all this files, and do something like this:
require "simplelogica_the_game/version"
require "simplelogica_the_game/sprite"
require "simplelogica_the_game/bullet"
require "simplelogica_the_game/ship"
require "simplelogica_the_game/enemy"
require "simplelogica_the_game/game"

module SimplelogicaTheGame

  def self.init
    begin
      $game = SimplelogicaTheGame::Game.new
      $game.begin!
    rescue Interrupt => e
      puts "\r Something goes wrong! :("
    end
  end

end

SimplelogicaTheGame.init
Then, create a file in bin folder (e.g. bin/simplelogica_the_game.rb), which is the one that you'll execute and initialize the game, with this code:
#!/usr/bin/env ruby

ENV['BUNDLE_GEMFILE'] ||= File.expand_path('../../Gemfile', __FILE__)

require 'bundler/setup'

require_relative "../lib/simplelogica_the_game.rb"
Make sure that this last file is executable (chmod +x bin/simplelogica_the_game), and try to run it by typing bin/simplelogica_the_game from console. With a little effort and some lines of code, you could have something like this running:

Title screen

Gameplay

Game over screen
Please, clone my repo and try to play the game so you can see all this pixels in action! :D
I hope you liked the post, and I encourage you to begin with game development and become the new master indie developer (or at least try it with Gosu), but please, while you develop some great game, listen to this song... So many good old memories... Kirby for the win! :_D
Any place where I can see the result?
Yeah! Here you have the Github repo for this example, so you can clone it, change it, play with it... whatever you want! :)

